Hello World
We’re going to walk you through creating your first project on your local directory - or in your development environment. Here are the steps we will walk through:
- Write a workflow and a couple of tasks
- Install and set up the Zenaton Agent
- Dispatch our tasks and workflow from anywhere
- View our executed tasks and workflow on the Zenaton Dashboard.
First we will create a directory zenaton-helloworld and a src directory inside of it.
mkdir -p zenaton-helloworld/src && cd zenaton-helloworld
Copied
# Writing our Workflow
Our workflow:
- has a parameter
nameas input (with"World"as default) - starts by dispatching a
GetSentencetask that will output the stringHello ${name}! - only when completed, will dispatch a
LogSentencetask that will print the output of the first task on the console.
./src/HelloWorld.js
module.exports.handle = function*(name = "World") {
  const sentence = yield this.run.task("GetSentence", name);

  yield this.run.task("LogSentence", sentence);
};
Copied
TIP
If you want to do more with your workflows, learn more about implementing workflows with Zenaton
# Writing our Tasks
Now using the Zenaton library, we’re going to create 2 sample tasks into the src directory:
- The first one will be called
GetSentenceand use the name as the parameter and returnHello ${name}! - The second one will be called
LogSentenceand will display a sentence in the console.
./src/GetSentence.js
module.exports.handle = async function(name) {
  return `Hello ${name}!`;
};
Copied
./src/LogSentence.js
module.exports.handle = async function(sentence) {
  console.log(sentence);
};
Copied
# Writing our Boot file
Tasks and workflows will be processed in the background by a Zenaton Agent.
We need to provide a boot.js file to this Agent that will describe where to find tasks and workflow definitions:
./boot.js
// load dependencies
const { task, workflow } = require("zenaton");

// define workflow
workflow("HelloWorld", require("./src/HelloWorld"));

// define tasks
task("GetSentence", require("./src/GetSentence"));
task("LogSentence", require("./src/LogSentence"));
Copied
To be able to load the Zenaton node library add a package.json file with following dependency:
- ./package.json
{
  "engines": {
    "node": ">=8.0.0"
  },
  "dependencies": {
    "zenaton": "^0.7.3"
  }
}
Copied
Then install dependencies:
npm install
Copied
# Installing Zenaton Agent
Now we are going to install the Zenaton Agent on our computer so that Zenaton can orchestrate our tasks and workflow in the background.
Zenaton does this without needing any additional code. You just have to install the Agent and deploy your sources wherever you want your tasks to be processed. As your sources are already in your computer, we only need to install the Agent now.
If you wanted to deploy to another environment (like in production), you would need to install the Zenaton Agent on the servers ("workers") where you wanted to execute tasks and workflows. Zenaton automatically orchestrates the processing of your tasks and workflows on distributed workers and monitors all of the activity.
If you have not already installed the Zenaton Agent on your computer, do that here.
curl https://install.zenaton.com | sh
Copied
Depending on your configuration, you may be asked for a password to allow global installation of Zenaton.
If you need to deploy the Agent on a particular system like Docker, Heroku, or Clever Cloud, we have some precooked solutions for you.
Finally, we need to provide our AppId and ApiToken which we will find on Zenaton Api section, so that the Agent can listen to our configuration and report processing status back to our engine and your Zenaton dashboard:
zenaton listen \
  --boot=boot.js \
  --app_id=<AppId> \
  --api_token=<ApiToken> \
  --app_env=dev
Copied
You should see Zenaton worker is now listening to app "<AppId>" on env "dev" in Javascript.
If you see Unauthenticated, it probably means that AppId and ApiToken values have not been correctly copied.
Note that once an Agent is installed, you can always check the Agents monitoring section on the dashboard to view Agent settings and activity for each environment.

# Dispatching standalone tasks
We are now ready to securely dispatch tasks from any computer provided it has access to the Internet! To trigger the processing of a task, just run the following command
node launch_task.js
Copied
with launch_task.js:
// authorize a Zenaton client
const { Client } = require("zenaton")
const client = new Client("<AppId>", "<ApiToken>", "dev");

// dispatch a task to be processed in background
client.run.task("LogSentence", "Print to zenaton.out!")
Copied
After a second, you should see Print to zenaton.out! in zenaton.out file.
# Dispatching workflows
We can also securely dispatch workflows from any computer as long as it has access to the Internet! To trigger the asynchronous processing of this workflow, just run the following command:
node launch_workflow.js
Copied
with launch_workflow.js:
// authorize a Zenaton client
const { Client } = require("zenaton")
const client = new Client("<AppId>", "<ApiToken>", "dev");

// dispatch a workflow to be processed in background
client.run.workflow("HelloWorld", "Gilles")
Copied
After a few seconds, you should see Hello Gilles! in zenaton.out file.
# Logging
Everything written to stdout during the processing in background of your your tasks will be in the zenaton.out file, that you'll find in the same directory than our sources. For example, after first launch, you should see:
./zenaton.out
Hello World!
Copied
If we do not get the expected result, we should look at ./zenaton.err file, where all errors are collected from stderr channel.
# Monitoring
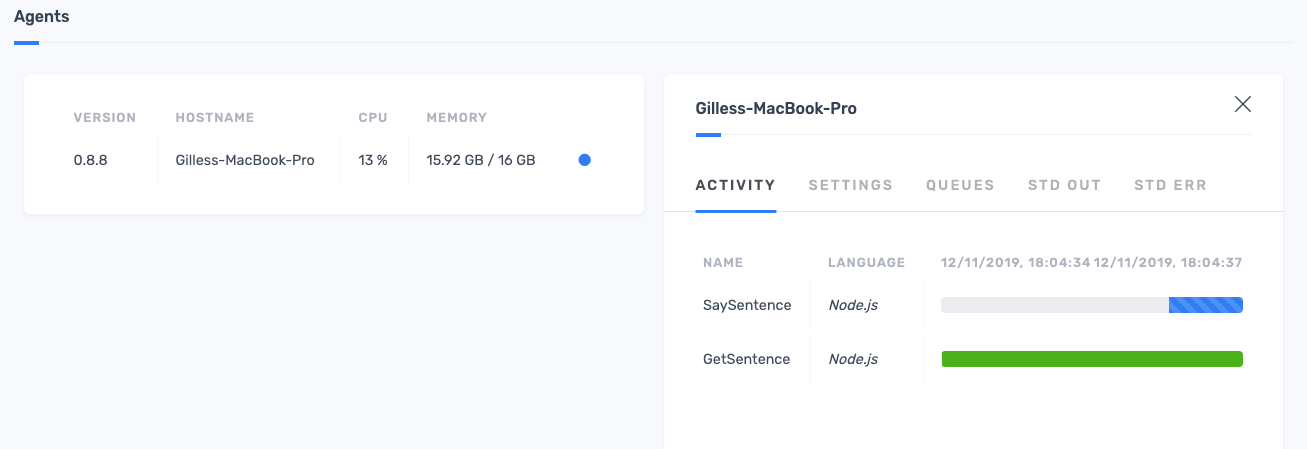
We can check the Agents section on our dashboard which allows us to monitor the real-time activity of each of our connected Agents:
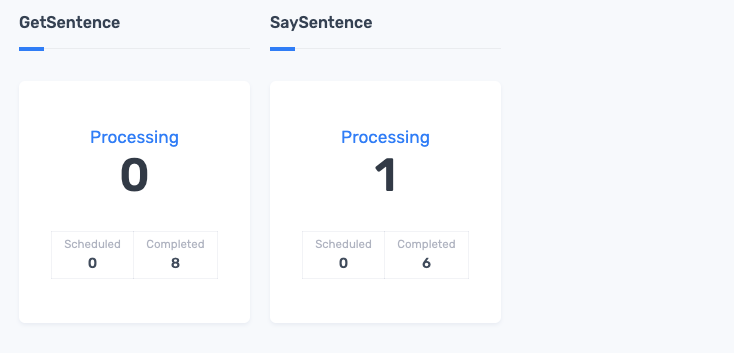
We can check the Tasks section, of the dashboard to monitor the real-time processing of our individual tasks:
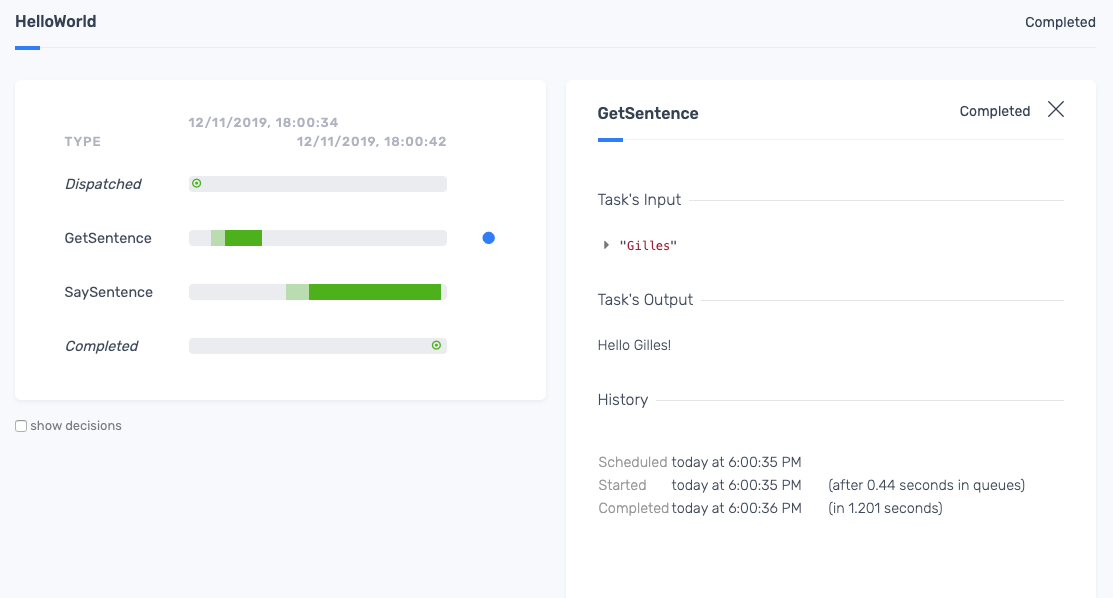
And we can also check the Workflows section of our dashboard to see an overview of all of our processed tasks and workflows, including real time-monitoring of tasks that are in progress.
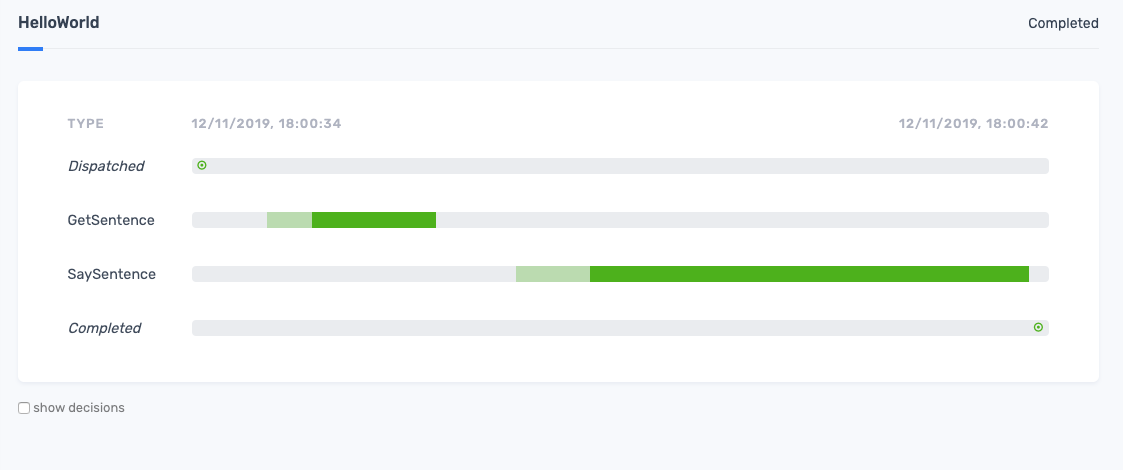
Click on each task to see the full details: